ELK
本文共 533 字,大约阅读时间需要 1 分钟。
Elk
Elasticsearch logstash kibana 传统:Shell sed awk grep 简单的信息筛选 进行海量日志的筛选遇到的问题:1信息搜索(费时) 2 多维度分析 适用于服务器数量少 因此,海量日志的情况下需要日志分析系统 日志分析系统常见方案:ELF /EFK/graylog/流式分析/ELK 日志分析系统作用: 1 信息检索——>快速找到bug——>修复 2 服务诊断——>负载均衡和运行状态——>优化 3 数据分析——> 日志系统的角色(组件): 1 采集端(agent):采集日志源数据,对数据进行封装并发送给聚合端。 2 聚合端(collector):搜集来自多个采集端的日志数据,并按照一定规则进行数据的处理(例如:加索引)。 3 存储端(storage):负责存储来自聚合端的数据。ELK方案示意图
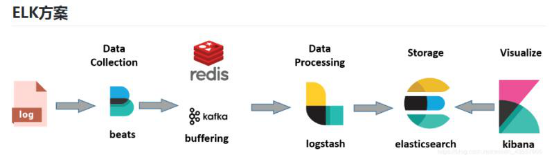
data collection数据的收集
Redis 消息队列(可加可不加) Data processing 数据的处理 Storage 存储 Visuablize可视化(获取数据进行显示) Beats 负责对日志源数据进行采集 Logstash 建立索引 Elasticsearch 存储实验
基础环境 四台虚拟机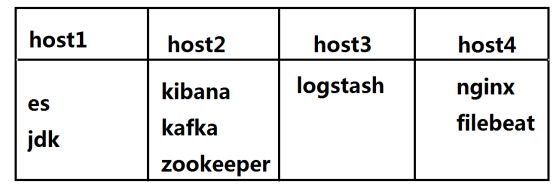
转载地址:http://szgkk.baihongyu.com/
你可能感兴趣的文章